Getting started
When you need it: You juggle several jobs, share the same people across them, and need delivery dates you can actually defend.
Turn your job list into one optimal schedule with an honest finish date per job.
- Feed it - your jobs, the tasks in each job, and the people who do the work.
- Get back - who does what, in what order, and when each job finishes, respecting deadlines, skills, your calendar and time off.
- Try it dry - do all of this on the sample workload first, then build your own from the Workloads screen.
Key terms
The building blocks, from the whole plan down to a single step:
- Workload - a complete plan you solve: people, jobs, and a calendar. Keep several (your live plan, plus what-if copies).
- Resource - a person who does the work, with a role and skills.
- Job - one piece of work, with a priority, broken into tasks (each task can carry its own target date).
- Task - a single step: work remaining (days), the roles and skills it needs, an optional target date, and what must finish first.
Shared, account-wide vocabulary that keeps every workload consistent:
- Roles (e.g. Plumber, Carpenter) - who can do a piece of work.
- Skills (e.g. tiling) - gate work that needs them.
- Task templates - named step types that fill the task dropdowns.
- Job templates - a whole task flow saved for reuse (steps, roles, skills, dependencies, durations).
Add your people
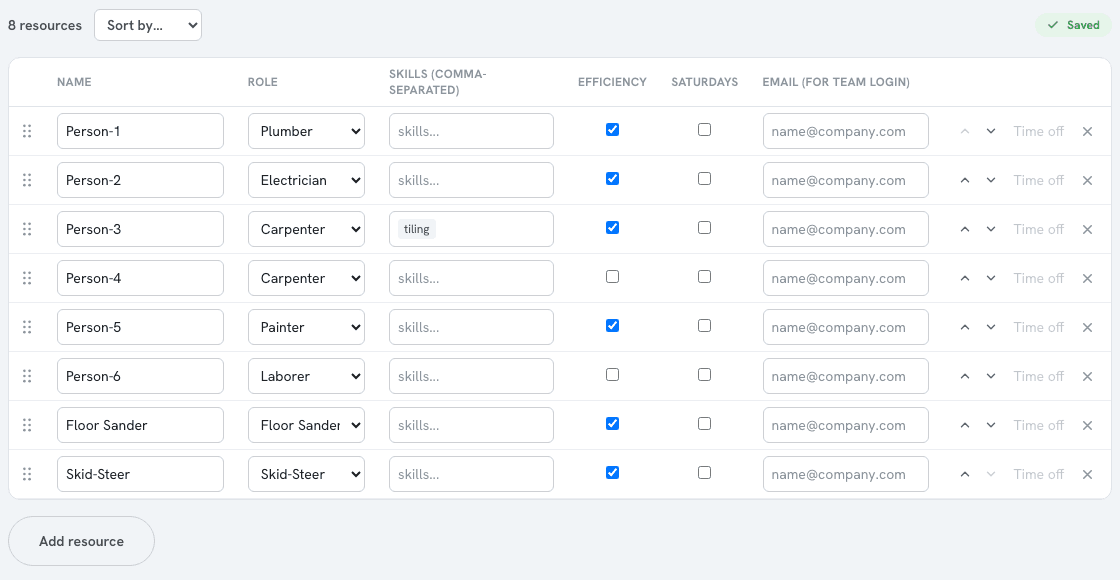
On the Resources tab, add each person:
- Role + skills - what they can be assigned to.
- Efficiency - tick people who work at full speed; less-experienced people get a configurable experience adjustment so estimates stay realistic.
- Saturdays - tick anyone who will work Saturdays or public holidays on a rush job.
- Availability - record periods when a resource is unavailable (leave, breakdown, maintenance) so the scheduler never assigns work on those days.
Build a workload
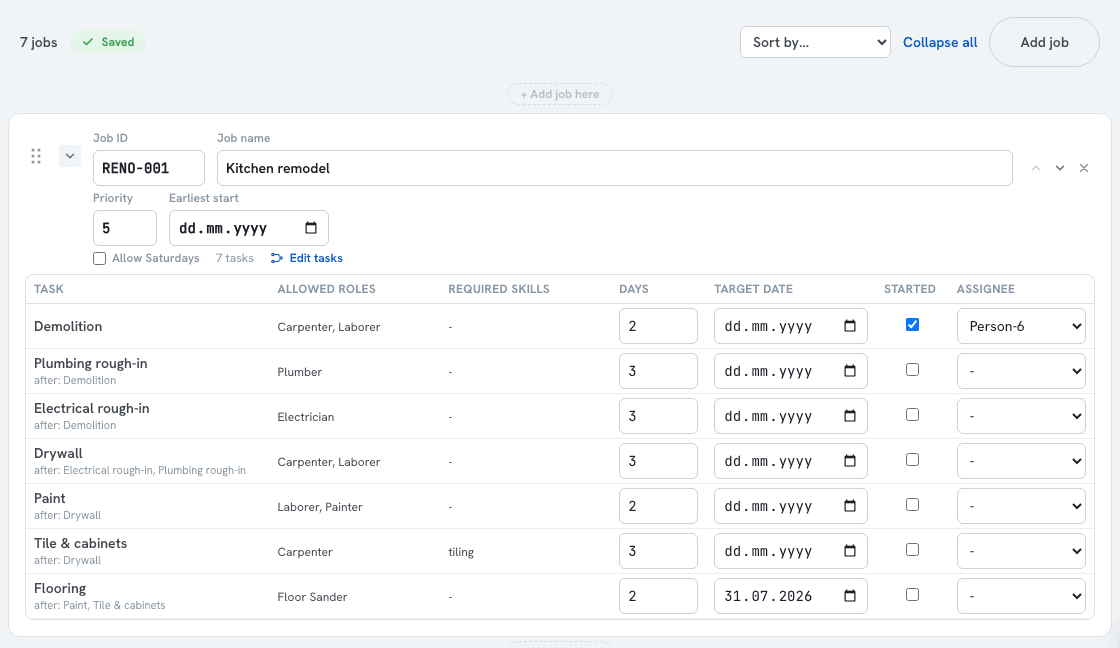
On the Jobs tab, add each job and its tasks:
- Per task - work remaining (days), allowed roles (any one qualifies), required skills, and an optional target date. Each job needs at least one task with a target date.
- Per job - priority, and an earliest start if it cannot begin yet.
- Already underway? - mark the task Started and pick its assignee; the optimiser keeps that work with that person.
- Reorder - drag a job by its handle. Jobs start collapsed; expand one to edit its tasks.
Target dates
When you need it: A job has internal checkpoints - not just one final delivery date - and you need every one met.
Any task can carry a target date (its due date). A job can carry several: a chain of checkpoints - design signed off, materials on site, first fix done, handover - each pinned to its own task.
- Set it - the Target date column on the Jobs tab, or the date chip on a task card in the canvas.
- At least one per job - every job needs a target date on one of its tasks; autosave pauses until you set one.
- The optimiser hits them all - it minimises the total late time across every targeted task in the whole workload, weighted by each job's priority. Internal checkpoints count, not just a single finish date per job.
- How a job reads as late - by its worst-missed target; the Results tab shows where each forecast lands.
Task dependencies & job templates
When you need it: A job has steps that overlap or wait on each other, or you run the same flow of steps again and again.
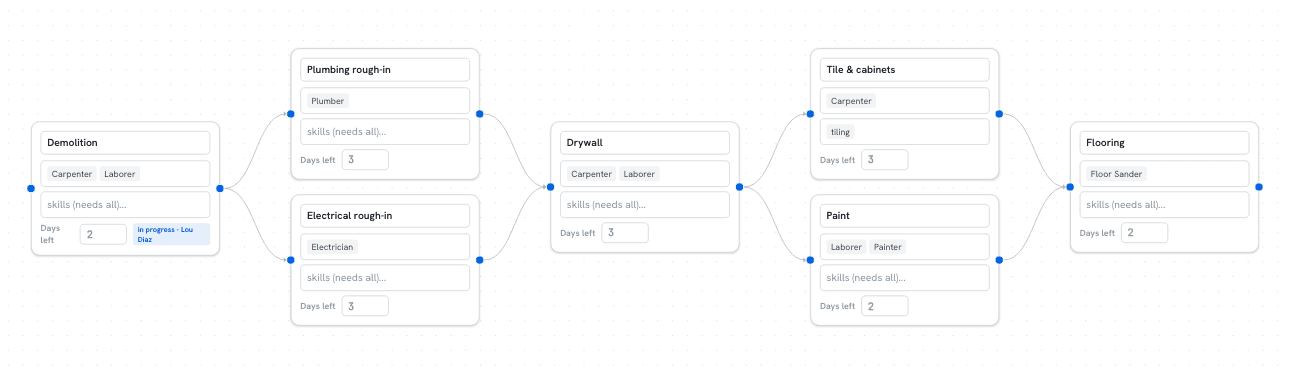
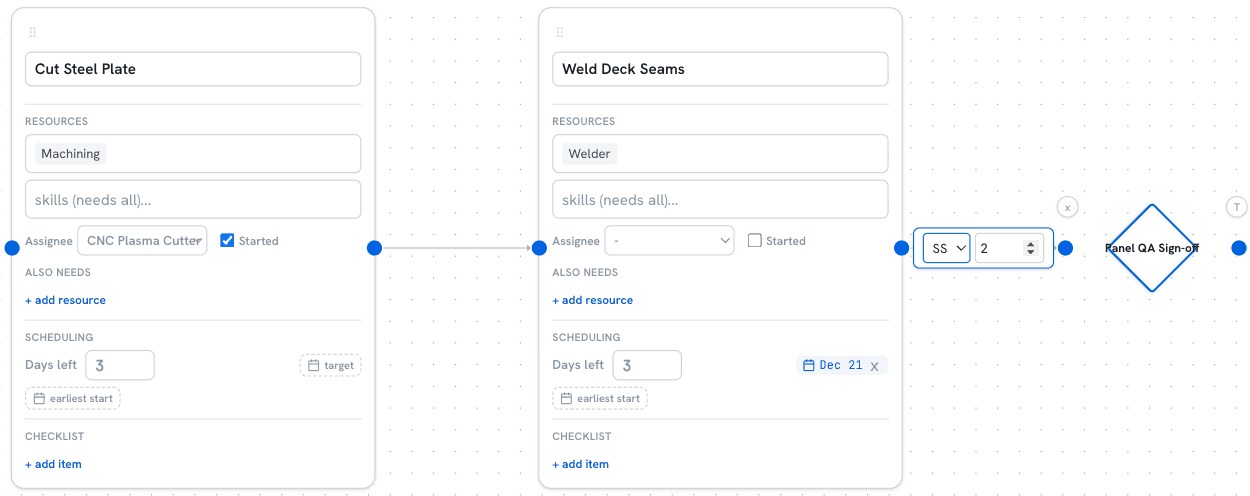
Open Edit tasks on a job to get the task canvas. Each task is a card:
- Arrow between cards - a dependency; by default the second task cannot start until the first finishes.
- No arrow - the tasks run in parallel on different people, so the job finishes sooner.
- Add one - drag from a card's right handle to another card's left handle.
- Example - after drywall, painting and cabinets run at once; flooring waits for both to finish.
Dependency types & lag
Click an arrow to set how the two tasks relate and any gap between them. The arrow shows a small badge for the choice; a plain finish-to-start link with no gap stays unlabelled.
- FS - Finish to Start (the default) - the next task starts after the first finishes. Cabinets after drywall.
- SS - Start to Start - the next task starts once the first starts; they run together. Inspection shadows welding.
- FF - Finish to Finish - the next task finishes once the first finishes. Clean-up wraps up with painting.
- SF - Start to Finish - the next task finishes once the first starts. Rare; for hand-over overlaps.
- Lag or lead - a number of working days in the same editor. Positive is a wait (a 7-day cure shows as +7d); negative is an overlap, so the next step starts early (-2d). With a type it reads SS+2d or FF-1d.
Milestones
Turn a task into a milestone with the diamond button on its card - a zero-duration checkpoint such as design sign-off, materials on site, or hand-over. It carries a name and an optional target date but no work, roles or assignee, and lines up with the tasks that feed it. Convert to task turns it back.
Job templates (on a workload's Templates tab) make repeat work one click:
- Save a whole task flow - names, roles, skills, dependencies, default durations.
- Start from template on a new job, or insert one into an existing job from the canvas.
- New accounts come with two templates to start from.
The canvas keeps the structure valid:
- Loops are blocked from saving (the offending arrows turn red).
- Disconnected groups of tasks are fine - they just all run in parallel.
Import from MS Project
When you need it: You already plan this work in Microsoft Project and want it in WorkloadLab without re-keying it.
WorkloadLab reads MS Project's XML format - in MS Project use Save As and choose XML (a .xml file). Bring it in two ways:
- New workload - on the Workloads list, Import MS Project, then pick the file; a workload is built from it.
- Re-sync - on an imported workload, Settings -> Import / re-sync MS Project pulls a fresh copy of the file's structure over your plan, with a preview first.
What comes across:
- Each top-level summary task becomes a job; the tasks under it become that job's tasks.
- Task links become dependencies, carrying their type (FS, SS, FF, SF) and lag.
- Milestones come in as milestones; durations become work remaining; a deadline becomes a target date.
- A task that is partly done (percent complete) comes in Started and pinned, as long as it has a single person on it; work on a shared, multi-person role keeps its remaining days for the optimiser to assign.
- Resources become your roster (a resource's max units becomes a headcount), and the project calendar - working week and holidays - is applied on first import.
What stays yours. MS Project owns the structure, roster and dates; WorkloadLab owns execution - who is assigned, what is started, checklists and required skills. A re-sync refreshes the structure but keeps the execution state you have built up.
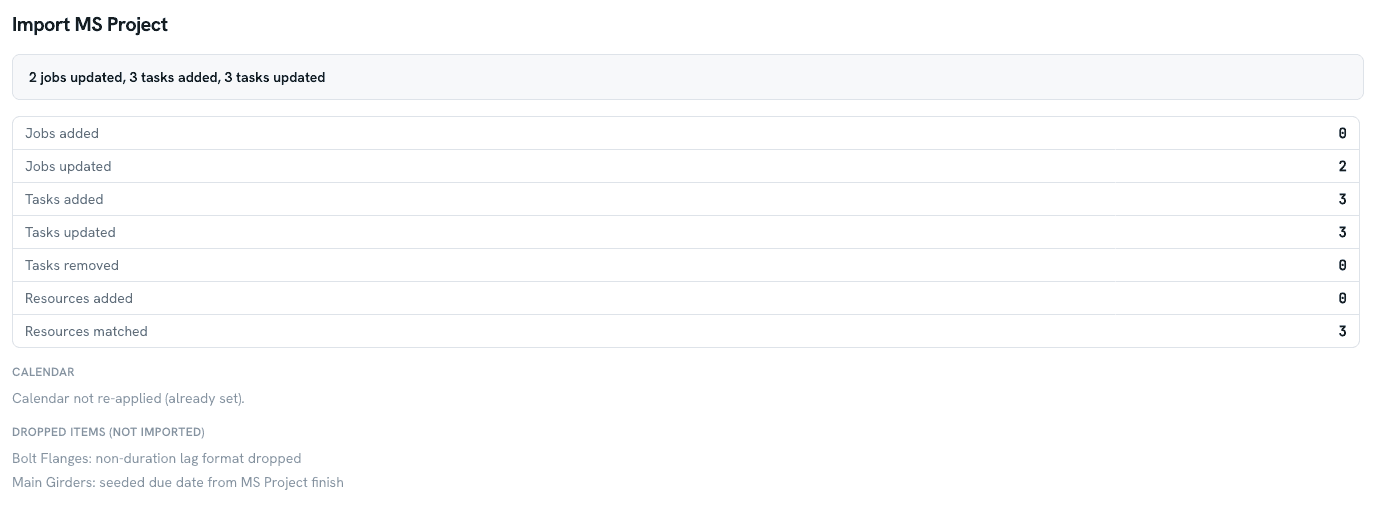
- The preview lists what will be added, updated, removed or dropped, plus any new roles and the calendar.
- If the file would remove tasks that already have progress, you confirm that first - nothing destructive happens silently.
Checklists
When you need it: A task is more than "X days of work" - it has concrete steps you want ticked off and captured as it runs.
Give any task a checklist of items: open Edit tasks, then + add item on the task card. Checklists are for tracking and data capture - they never change the schedule.
- Completion gate - the assignee cannot close their task (take it to 0 days) until every item is ticked.
- Manager override - you can still force a task to done from Active Tasks or the Jobs tab; any unticked items are auto-checked.
- In daily reporting - each person sees "Your checklist (2 of 5 done)" on their own task and ticks items as they go.
- At a glance - the Active Tasks tab shows a done/total badge per task; expand a row to tick items inline.
- Reusable - save a job as a template and its tasks keep their checklist, so the same steps come back every time.
Solve & read the plan
Press Solve. WorkloadLab minimises late, high-priority work within every constraint and shows the result on the Results tab.
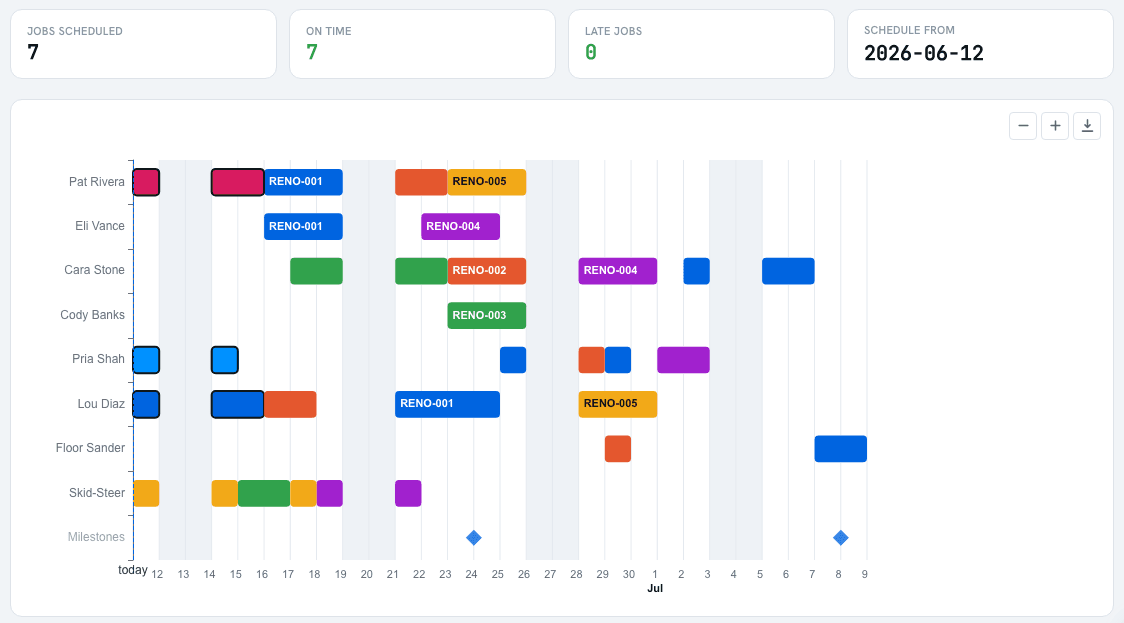
- Timeline - a Gantt, one row per person, with each job's forecast finish date.
- Grey bands - non-working days (weekends, public holidays). The dashed line is today.
- Plan from - the date the plan is built from (day 0); the today line tracks the real today, so an older plan shows time having moved on.
Reading the Results tab
- Each bar carries the Job ID - the same reference in tooltips and on the PDF.
- Jobs legend - a colour per job, a Visible toggle, and row hover to highlight a job's bars.
- Zoom the timeline with the top-right buttons.
- Export PDF - a dated landscape page: chart plus the Jobs and active-tasks tables.
How the optimizer assigns work
- Target dates first - it minimises total late time across every targeted task, weighted by each job's priority.
- Started tasks never change hands (their days can still shift).
- A pick on a future task is kept unless honoring it would make something late.
- Unassigned tasks are placed freely; a re-solve may move them for a better plan. Equal-quality shuffling is avoided.
- Within those rules it pulls work as early as possible and avoids fragmenting a person's task.
- Who qualifies: anyone with any one allowed role, holding ALL required skills.
Resource loading
When you need it: You want to know whether you are over- or under-staffed before you promise a date - which people, roles, or skills are maxed out, and who still has room.
At the bottom of the Results tab, the Resource loading table shows utilization over a near-term window, so a bottleneck jumps out at a glance.
- Break it down - by Resource, Role, or Skill. Role and skill views pool everyone in the group, so you can see if a whole skill is running hot.
- Pick a window - the next 1, 2 or 4 working weeks, or the whole plan.
- Read the bars - busy vs available working-days, and a utilization %. Red is at capacity (no headroom), amber is nearly full, and a faint bar is idle (spare capacity).
- Daily Tasks - pick any date to see who is on what that day.
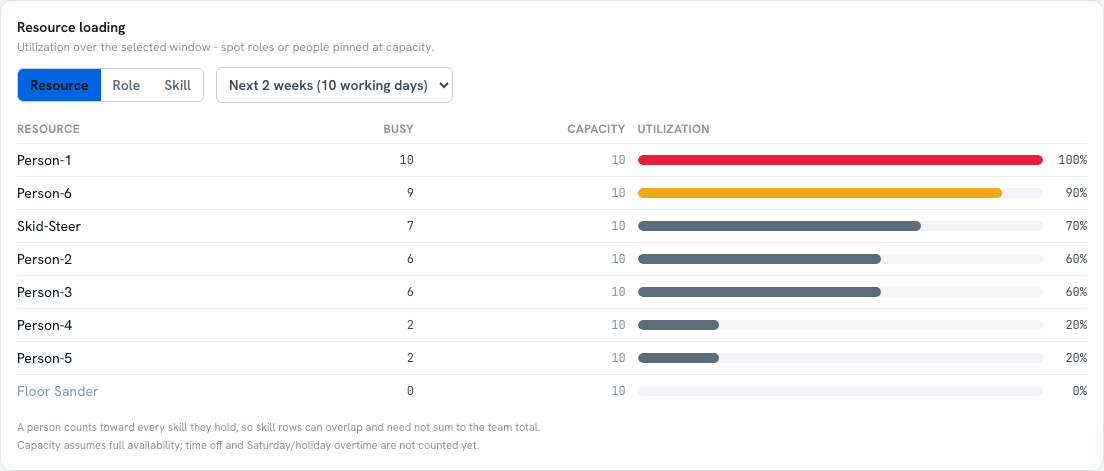
A skill row counts everyone who holds that skill, so skill rows overlap and need not add up to your team total. Capacity assumes full availability; marked unavailability and Saturday overtime are not netted out yet.
Quote a new job (RFQ)
When you need it: An enquiry lands and you must promise a delivery date without breaking existing commitments.
- Drop the prospective job into your plan, or into a what-if copy, and solve.
- Read its forecast finish against everything already committed.
- See whether it pushes any existing job late before you promise it.
The payoff: quote from true capacity, not gut feel.
What-if scenarios
When you need it: You want to test a change - new job, lost person, moved deadline - without touching the live plan.
- Create what-if scenario branches an editable copy you can solve freely.
- Compare to the original: later jobs are red, earlier are green, new jobs highlighted, and a change bar shows each shift.
- Keep the scenario or discard it.

Daily updates
When you need it: Work is in progress and you want the plan to stay honest as estimates move.
- Active Tasks tab - nudge the days remaining with the − / + steppers; it autosaves.
- Take a task to 0 to mark it done - it drops off and will not be scheduled next time.
- Tick a task's checklist items as steps finish; the done/total badge tracks progress (see Checklists).
- Re-solve whenever you like; estimates not confirmed recently are flagged stale.

Calendar, holidays & Saturdays
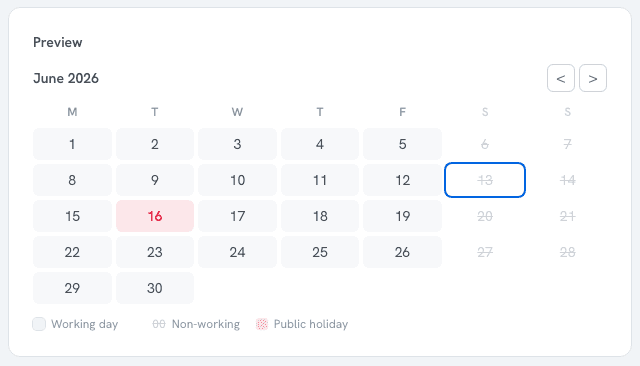
- Account → Calendar - set your working week and public holidays once for the whole account (import a country's holidays in a click, 13 supported). Non-working days are shaded grey and skipped when scheduling.
- Per-resource unavailability - on the Resources tab, use the Availability button on each row to record periods when that resource is unavailable (leave, breakdown, maintenance). The optimiser keeps work off those days automatically.
- Rush a job - flag the job Allow Saturdays and the people Saturdays; the optimiser uses Saturdays and public holidays to pull that job in, while everything else stays on normal days.
Need a hand?
If your process does not map cleanly onto this flow, tell us from the Workloads list, or use the Need help button in the app any time. See also our privacy policy.